Producing a shoe is a lengthy and detailed process. The steps involved can vary between 70 and 300 or even more. The number of steps needed largely depends on the type of shoe being made, if it completely handmade, if it is a bespoke shoe or other similar factors (read our blog on Custom, MTO & Bespoke Shoes here to get an overview on the different options of shoe production).
But before even getting to the shoe workshop, there is an entire creative process that takes place that includes experimentations with materials, defining a concept and coming up with design ideas to prototype.
To come up with truly unique footwear, research and experimentation should not even start with looking at shoes, otherwise the final product will just look like an adaptation of the initial shoe. Inspiration for a new design can come from anywhere. It can be the result of an experience, a new material found, a song that has instigated emotions, from daily life or even our dreams.
When the starting point is personal and unique, it will most definitely lead to a unique final product as well, and this is what we aim for at the Rana Cheikha Brand. Read on to find out our process.
From Concept to Prototype to Final Product, an Overview:
-
Research and experimentation
Research and experimentation is perhaps the most important (and freeing) part of any design process. At this point, we can think of anything except for the final product. We experiment with ideas and materials and think of anything that is possible and impossible to make. It is the stage of freedom and letting go. It does not matter in which direction one goes, everything is gathered, observed, felt and appreciated. And from all that is gathered and put together, we can define one direction (or more) towards which we choose to move in.
-
Define the concept
The concept is the starting point of any product being made. This is where all the research and experimentation is brought forth and studied until a chosen concept is defined and further refined. This concept is used as the base of all designs, and the reference point to every item in a collection. It ensures a united feel, aesthetic and mood across the field.
-
Define the style
Now that we have a concept, we can identify the style of the product we are working with. This can vary from the form and function, to the production techniques used. It is the umbrella under which we will now work under to make decisions in selecting colours, materials and styles.
-
Select shoe shapes and materials
Deciding on the direction for the shapes coincides with the style we want to have - if we are creating casual or formal shoes, or a product that is ideal for various occasions. It does not limit the select to one, on the contrary, if we are designing a collection, a varied yet cohesive collection is ideal. We select characteristics such as toe shape, heel height, and form.
-
Design the collection
Many would think that designing the shoe is the first step in the process. But as you have read, a lot happens before the initial sketch of a shoe. It is here, in the collection design stage, that everything that was gathered and looked at turns into elements of references for designing the shoe. There is no defined number of shoes for a shoe collection, and it can vary from one model made in various colours of materials, to several models made in a single or combination of colors and materials. These decisions are all part of the concept direction. The main goal of creating a collection under the concept umbrella defined is to make sure that every piece is part of the same family. Sketches are put together and then turned into technical drawings to identity every detail required for the shoe.
-
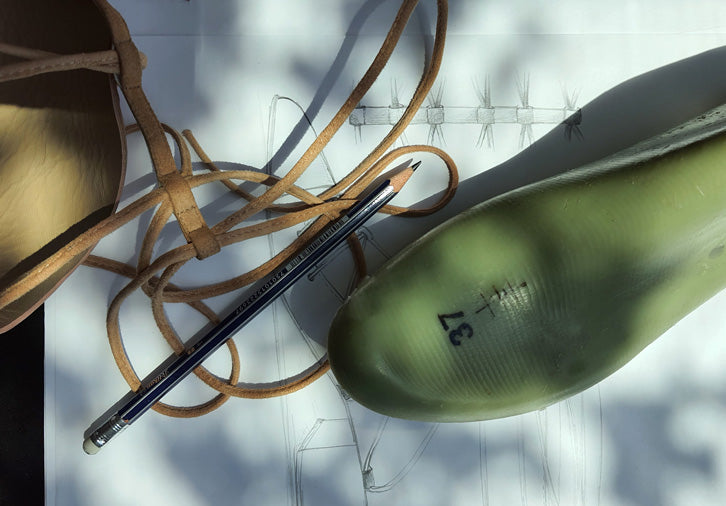
Select the shoe last
Selecting the shoe last is of utmost importance. This is based on the design on the shoe. The last is the mould and base which will define the shape of the shoe. It is what every pair of shoes is made on.
-
Pattern making and cutting
The pattern making stage is a critical one where a highly skilled artisan is in charge to take the 2-dimensional drawing and create the parts required to make the 3-dimensional version. Here, the pattern maker takes the design drawings of the shoe and uses the shoe last to create the pattern. He starts by making a paper pattern of the style in the various pieces that would be needed (and may include pieces such as a vamp, toe cap, tongue, quarters and lining). The materials chosen for the shoe may also effect the measurements of the patterns made.
-
Pattern cutting
Once the pattern is complete, the pattern cutter then takes the material chosen and cuts the pattern pieces. This is an extremely important and technical stage as the cutter needs to study the material, asses the sections that can be used or not (this is especially in the case of materials such as leather that naturally come with marks and scars to be avoided - you can read about the different types of shoe leathers here for Part 1 and here for Part 2 to get an idea), as well as the thickness, stretch and grain/direction of the material. It is also imperative to include all the markings that the pattern maker may have added that act as guides for the assembly process.
-
Assembling the shoe with the closer
Next, the pattern pieces are handed over to the closer that, like a puzzle, puts the pieces of the shoe together. Here, the closer assembles all the pieces and stitches them together to form the full upper.
-
Create and test the prototype or sample shoe
The shoe is now ready to be made! The same last that was used to make the pattern is now used to form the shoe. The toe and heel stiffeners along with the insole and sole are all combined with the full upper that is lasted together.
-
Asses and adjust the prototype
Once the first shoe prototype is complete, it is used as a sample to study the details and form of the pattern and design as a whole. It is important for the designer and artisan to work closely together at this stage to ensure that the changes are suitable both visually and technically while staying true to the original concept. Adjustments may be decided on and may be aesthetical, technical for the pattern, or can be changes required for a more comfortable fit.
-
Re-make the prototype shoe based on the agreed adjustments (if any)
To guarantee that the changes made solve any problems and look good, a second sample is made with the alterations.
-
Asses the look and fit of the adjusted prototype
A second round of assessment takes place to ensure that the shoe meets expectations and all issues were resolved. This can be repeated as many times as needed until there are no further changes required.
-
Place the shoe into production
Once the designer and the artisan are happy with the final prototype, the shoe is now ready to be placed into production and made in the required quantities. This also means that the pattern maker will be able to scale the pattern for each size required making sure that the shoe will fit and look the same on all shoe sizes.
Making a beautiful well-designed shoe starts many steps before the first shoe sketch is made or before the first nail is hammered. A strong concept is imperative to create strong pieces with a clear and lasting brand identity. It is clearly important for the designer and artisan to have a close relationship and understand the technicalities as well as limitations of each field. When an understanding between the two is made, the cohesiveness in work will reflect in the final product being made, it will be a technically well-made product that is designed beautifully. All this creates stories and conversations between the designer and artisan and the wearer of the shoe without them having to even meet.
Signing-off: Rana Cheikha for The Shoe Advisor
// Get in touch here or by email at rana@ranacheikha.com for more insight, queries and information //